Below are all of the links to a specific How-To or Tutorial for editing the .bin file. Remember, this file is the Genesis version of the game. You can download the Bin file here or on the downloads page. If you are new to editing, make sure you read the main editing page first.

Important Item to Change Before Playing An Edited .bin File
by Evan
Before you can play an edited .bin file, you must change the value highlighted in screenshot 1 below (BOFC) to screenshot 2 (4E75). This is the offset of 000FFACB, and you only have to do this for the .bin (Genesis) version of the game.
Bin File Offset: 000FFACB
Screenshot 1 (Incorrect value.)

Screenshot 2 (Correct value.)

The .bin file won't play unless you change this code.
by Evan
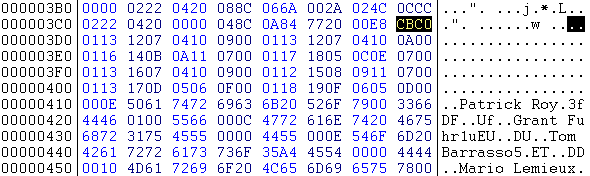
Below is a chart I made to help understand what the player's hex code means in Hex Workshop. In this example, I have highlighted Dave Gagner's data from the original NHL94.bin file. To change names, numbers, and ratings, you would simply type over the data.

 player's character length (this is a code telling the game how many characters this name is, 0E = 11 characters - this chart is in the player ratings chart below)
 player's name
 space to finish player's name length (for some players, this is just an extra space to fill up the remaining character of their name)
 player's number
 player's ratings (these ratings are all explained in the player ratings chart below)
 part of the next player's character length (in this case, for Neal Broten, 000E)
Note: Each team's roster must keep the same number of characters. If you switch Dave Gagner's name from 11 characters to 9, you must add 2 characters somewhere else on that roster.
To edit a player's jersey number, simply find their name in the .bin file using Hex Workshop, and their number will be right after their name. I have highlighted Nelson Emerson's number (07) in the screenshot below to give you an example. Now you would simply type the new number over it. Sometimes you may see a "00" between the players name and their number. This is just to give a space to certain player's names.

|
Player Ratings Chart - Use this for reference to edit all ratings. |
||||
| Player's Weight | All Other Abilities | Forwards and Defensemen | Goalies | Character Length |
|---|---|---|---|---|
| 0 - 140 | 0 - 14.3 | 1st Digit - Weight | 1st Digit - Weight | 0A = 6,7 letters |
| 1 - 148 | 1 - 28.6 | 2nd Digit - Agility | 2nd Digit - Agility | 0C = 8,9 letters |
| 2 - 156 | 2 - 42.9 | 3rd Digit - Speed | 3rd Digit - Speed | 0E = 10,11 letters |
| 3 - 164 | 3 - 57.2 | 4th Digit - Offensive Awareness | 4th Digit - (leave at zero) | 10 = 12,13 letters |
| 4 - 172 | 4 - 71.5 | 5th Digit - Defensive Awareness | 5th Digit - Defensive Awareness | 12 = 14,15 letters |
| 5 - 180 | 5 - 85.8 | 6th Digit - Shot Power | 6th Digit - Puck Control | 14 = 16,17 letters |
| 6 - 188 | 6 - 100.1 | 7th Digit - Checking | 7th Digit - (leave at zero) | 16 = 18,19 letters |
| 7 - 196 | 8th Digit - Handedness (0,2,4,6,8,A,C,E) - Lefty (1,3,5,7,9,B,D,F) - Righty |
8th Digit - Handedness (0,2,4,6,8,A,C,E) - Lefty (1,3,5,7,9,B,D,F) - Righty |
||
| 8 - 204 | 9th Digit - Stick Handling | 9th Digit - (leave at zero) | ||
| 9 - 212 | 10th Digit - Shot Accuracy | 10th Digit - (leave at zero) | ||
| A - 220 | 11th Digit - Endurance | 11th Digit - Stick Right | ||
| B - 228 | 12th Digit - (leave at zero, this could have been for fighting possibly) | 12th Digit - Stick Left | ||
| C - 236 | 13th Digit - Pass Accuracy | 13th Digit - Glove Right | ||
| D - 244 | 14th Digit - Agressiveness | 14th Digit - Glove Left | ||
| E - 252 | ||||
| F - 260 | ||||
by Evan
You can easily edit team's uniform colors by editing just a few things in the hex code (using Hex Workshop). For example, changing the first set of numbers in the yellow (0006) to something different, like (CCCC), will change the pants color to grey. Use the chart below as a reference to which colors are for what parts of the uniform. The first set of colors is the home colors, and the second set of colors is the away.
The colors for a team begin before that team's roster. So in the example below, we are looking at Calgary's colors, not Buffalo's.
Note: Editing a team's uniform colors will change the colors of their ice logo as well.

Pants color - 1st 4 digits (0006) is the main color, 2nd 4 digits (0008) is the lighter color, and 3rd 4 digits (000A) is the darker color (this creates a fade in the pants, so try to make these colors similar) Pants stripe and elbow trim Shoulder trim, waist stripe, and top sock stripe Shoulder color, elbow, and sock Jersey and helmet - 1st 4 digits (0CCC) is the main color, 2nd 4 digits (0EEE) is the lighter color, and 3rd 4 digits (0AAA) is the darker color (this creates a fade in the jersey, so try to make these colors similar) Stick (same for all teams) Player shadows on the ice (same for all teams)
 Player skin color - 1st is main color, 2nd set is shadow color (same for all teams)
by Evan
Thanks to some members of the community, we are able to edit the period lengths. Below are a few screenshots and tables to help you understand how this is done.
Changing the Purple 0258 will edit the overtime length. Changing the Blue 012C will edit the "5 minute periods" length. Changing the Orange 0258 will edit the "10 minute periods" length. Changing the Green 04B0 will edit the "20 minute periods" length.
Below are some of the period lengths you could try. Just remember to fix the text that goes with the lenghts using the 2nd and 3rd screenshots as reference.
Bin File Offset: 0000782C (lengths)
Bin File Offset: 000F7F3E (names)
Screenshot 1

overtime period length (this is 10 minutes by default, to make it 5 minutes change the 0258 to 012C) 1st game length setting (this is 5 minutes by default, which in hex 012C = 5 minutes) 2nd game length setting (this is 10 minutes by default, which in hex 0258 = 10 minutes) 3rd game length setting (this is 20 minutes by default, which in hex 04B0 = 20 minutes)Here's how to change the names of the period lengths on the startup screen. Simply change the text of these items and that will be what comes up in the startup screen menu.
Screenshot 2

5 Minutes 10 Minutes 20 MinutesThis is an example of changing the period length text from "5 Minutes" to "1 Minute".
Screenshot 3

by Evan
This is how you can edit the number of goalies and/or forwards a team has. This is also where you adjust the team's lines to you liking.
Goalies (Go to the 11th set of 4 digits after the "j" that starts the away jersey data.)
You can have a maximum of 4 goalies per team in the game. To add or subtract a goalie, you have to edit the 11th set of 4 digits after the "j" (highlighted in the screenshot above). Changing a zero to anything besides zero will add a goalie and changing a character to a zero will subtract one. The Islanders and Rangers both have 1 goalie so this set of digits is 9000 for them. Changing them to 9900 gives them 2 goalies and 9990 gives them 3 and 9999 gives them 4. These numbers don’t necessarily have to be a 9. Allstars East (above) has a CBC0 for their goalies. C is a goalie, B is a goalie, and C is a goalie. Changing the data from CBC0 to 9990 won't change anything in the game.
Note: Adding a goalie to a team with 1 goalie will make the 2nd player listed in the hex code a goalie, but he will also appear as a forward until you edit the default lines.
Look in the hex editor and write down each player in the order in which they appear in the code, then write down their order. When you get to the 10th player, list him as 0A, 11th as 0B, etc. 15th is 0F but for player 16 list him as 10, player 17 is listed as 11, etc. After you have done this, look after the 4 digit goalie code. You’ll see an 01. Starting after the 01 the teams “best line” is listed. This is the default lineup when line changes are off. Starting after the 01, those players are listed. It goes in the normal order, LD, RD, LW, C, RW. Just enter in the player orders you took down of each player you want to appear in each position on your “best line”. Starting after the next “01” is scoring line 1, then the next “01” is scoring line 2 and it goes in order all the way up to Penalty Kill 2.
I have highlighted Allstars East's lines in the example below.

best line (when line changes are off) scoring 1 scoring 2 checking line power play 1 power play 2 penalty kill 1 penalty kill 2Note: If you have added a goalie, then this will make your first forward appear in order “03" in the hex code when he was previously referred to “02”. The lines still point to player “02” so this explains why your new backup goalie will appear on some lines as a forward.
by Evan
Below is a screenshot of the rink data showing how to switch the ice color from blue to white. This is something that once you do, you may never want to play with the blue ice again.
Bin File Offset: 00059924

the ice color - simply change this number from 0EE8 to 0EEE center area of the lights reflection on the ice - you can just leave this at 0EEE lights reflection - also change this from 0EEC to 0EEEby Evan
Here's how you can change the length of each penalty in the game. A useful edit of this information could be making the second Roughing penalty a 4 minute double minor. Basically you would just change any of the "02"s below to whatever you like. "02" equals 2 minutes in the penalty box for whoever is called the penalty. You would simply make it "01", "04", "05", "10", or whatever you like. It seems that you can only have penalties in one minute intervals.
You can also edit the name of the penalty as you would change a player's name. Maybe changing one of the "Roughing's to a "Boarding" call. Another possibility could be making a misconduct penalty worth 10 minutes.
Bin File Offset: 00018ED5

Charging penalty length Slashing penalty length Tripping penalty length Roughing 1 penalty length Roughing 2 penalty length Hooking penalty length Cross Check penalty length Interference penalty length  Holding penalty length
 All 3 Fighting penalty lengths (1st two are the 5 min majors, the last one is the instigator)
I've tried making the fighting "28"s into "04"s like most of the other penalty values to see if a player could be called for "fighting", but I haven't seen it happen yet.
by Evan
Each team has 2 banners color sets, home and away. You have to change the colors for each set for the edit to work properly.
Bin File Offset: 000F8BF8
First set is the right side on the startup screen, second set is for the left side of the startup screen. The first set of 4 digits is the top half color of the banner and the second set is for the bottom half color. For example, Anaheim's first set of values is 0000 which equals black. Their 2nd set of values is 0042, which is green.
| Anaheim - 0000 0042 Boston - 0000 008C Buffalo - 0822 008C Calgary - 0006 008C Chicago - 0000 0006 Dallas - 0000 0042 Detroit - 0006 0006 Edmonton - 0600 004A Florida - 004A 0600 Hartford - 0042 0822 Los Angeles - 0000 0000 Montreal - 0600 0006 New Jersey - 0020 0006 New York(I) - 0822 004A |
New York(R) - 0600 0006 Ottawa - 0006 006A Philadelphia - 0000 004A Pittsburgh - 0000 008C Quebec - 0600 0006 San Jose - 0000 0860 St. Louis - 0822 006A Tampa Bay - 0000 0600 Toronto - 0600 0600 Vancouver - 0000 008C Washington - 0006 0600 Winnipeg - 0600 0006 Allstar East - 0000 004A Allstar West - 0000 004A |
You would simply find these values, and replace them with your custom value.
Screenshot 1

Anaheim's banner colors Boston's banner colors Buffalo's banner colors Calgary's banner colors Chicago's banner colors Dallas's banner colors Detroit's banner colors Edmonton's banner colors Florida's banner colors Hartford's banner colorsScreenshot 2

Los Angeles's banner colors Montreal's banner colors New Jersey's banner colors New York Islanders banner colors New York Rangers banner colors Ottawa's banner colors Philadelphia's banner colors Pittsburgh's banner colors Quebec's banner colors San Jose's banner colorsScreenshot 3

Once you've edited these colors to your liking, you can edit the tiles to say a different team name. Below is a chart of the default tile configuration for each team in the Bin. Using Tile Layer Pro, you can edit these tiles to what you like, and then specify the tile order in Hex Workshop.
Each banner has a total of 22 tiles, though almost every team shares tiles with other teams. New Jersey is a rare case where it has all 22 of it's own tiles. Each tile is given an ID. 2000, 2001, 2002, 2003, etc. 2800 means tile 2000 but mirrored.
| 1 of 4 | Anaheim | Boston | Buffalo | Calgary | Chicago | Dallas | Detroit | Edmonton |
|---|---|---|---|---|---|---|---|---|
| 1 | 2000 | 2000 | 2000 | 2000 | 2000 | 2000 | 2000 | 2000 |
| 2 | 2001 | 2001 | 2001 | 2001 | 2001 | 2001 | 2001 | 2060 |
| 3 | 2002 | 2011 | 201F | 202D | 203C | 2001 | 2052 | 2061 |
| 4 | 2003 | 2012 | 2020 | 202E | 203D | 2048 | 2053 | 2062 |
| 5 | 2004 | 2013 | 2021 | 202F | 203E | 2023 | 2054 | 2063 |
| 6 | 2005 | 2014 | 2022 | 2030 | 202E | 2049 | 2055 | 2064 |
| 7 | 2006 | 2015 | 2023 | 2031 | 203F | 204A | 2056 | 2048 |
| 8 | 2007 | 2016 | 2024 | 2032 | 2040 | 204B | 2057 | 2065 |
| 9 | 2008 | 2017 | 2025 | 2033 | 2041 | 204C | 2058 | 2064 |
| 10 | 2001 | 2001 | 2001 | 2034 | 2001 | 2001 | 2001 | 2048 |
| 11 | 2800 | 2800 | 2800 | 2800 | 2800 | 2800 | 2800 | 2800 |
| 12 | 2009 | 2009 | 2009 | 2009 | 2009 | 2009 | 3000 | 2009 |
| 13 | 200A | 200A | 200A | 200A | 200A | 200A | 3801 | 2035 |
| 14 | 200B | 2018 | 2026 | 2035 | 2042 | 200A | 2059 | 2066 |
| 15 | 200C | 2019 | 2027 | 2036 | 2043 | 204D | 205A | 201D |
| 16 | 200D | 201A | 2028 | 2037 | 2044 | 202A | 205B | 2067 |
| 17 | 200E | 201B | 2029 | 2038 | 2036 | 204E | 205C | 2068 |
| 18 | 200F | 201C | 202A | 2039 | 2045 | 204F | 205D | 2069 |
| 19 | 2010 | 201D | 202B | 203A | 2046 | 2050 | 205E | 206A |
| 20 | 2010 | 201E | 202C | 203B | 2047 | 2051 | 205F | 2068 |
| 21 | 200A | 200A | 200A | 200A | 200A | 200A | 3801 | 2069 |
| 22 | 2809 | 2809 | 2809 | 2809 | 2809 | 2809 | 3800 | 2809 |
| Offset: | 000B3060 | 000B308C | 000B30B8 | 000B30E4 | 000B3110 | 000B313C | 000B3168 | 000B3194 |
| 2 of 4 | Florida | Hartford | Los Angeles | Montreal | New Jersey | NY Islanders | NY Rangers | Ottawa |
|---|---|---|---|---|---|---|---|---|
| 1 | 2000 | 2000 | 208B | 2000 | 20AE | 2000 | 2000 | 2000 |
| 2 | 2001 | 2079 | 208C | 209E | 20AF | 20C4 | 20C4 | 2001 |
| 3 | 206B | 207A | 2013 | 209F | 20B0 | 20C5 | 20C5 | 206D |
| 4 | 206C | 207B | 208D | 20A0 | 20B1 | 20C6 | 20C6 | 20D3 |
| 5 | 206D | 207C | 2023 | 20A1 | 20B2 | 20C7 | 20C7 | 20D4 |
| 6 | 206E | 207D | 2048 | 20A2 | 20B3 | 20C8 | 20C8 | 2023 |
| 7 | 206F | 207E | 208E | 2055 | 20B4 | 20C9 | 20C9 | 20D5 |
| 8 | 2070 | 207F | 208F | 20A3 | 20B5 | 207F | 207F | 20D6 |
| 9 | 2071 | 2080 | 2090 | 20A4 | 20B6 | 20CA | 20CA | 2017 |
| 10 | 2001 | 2081 | 2091 | 20A5 | 20B7 | 20CB | 20CB | 2001 |
| 11 | 2800 | 2800 | 2092 | 2800 | 20B8 | 2800 | 2800 | 2800 |
| 12 | 2009 | 2009 | 2093 | 2009 | 20B9 | 2009 | 2009 | 2009 |
| 13 | 200A | 2082 | 2094 | 20A6 | 20BA | 20CC | 20CC | 200A |
| 14 | 2072 | 2083 | 2095 | 20A7 | 20BB | 20CD | 20CD | 20D7 |
| 15 | 2073 | 2084 | 2096 | 20A8 | 20BC | 20CE | 20CE | 20D8 |
| 16 | 2074 | 2085 | 2097 | 20A9 | 20BD | 20CF | 20CF | 20CC |
| 17 | 2075 | 2086 | 2098 | 2069 | 20BE | 20D0 | 20D0 | 202A |
| 18 | 2076 | 2087 | 2099 | 20AA | 20BF | 2087 | 2087 | 20D9 |
| 19 | 2077 | 2088 | 209A | 20AB | 20CO | 2088 | 2088 | 20DA |
| 20 | 2078 | 2089 | 209B | 20AC | 20C1 | 20D1 | 20D1 | 20DB |
| 21 | 200A | 208A | 209C | 20AD | 20C2 | 20D2 | 20D2 | 200A |
| 22 | 2809 | 2809 | 209D | 2809 | 20C3 | 2809 | 2809 | 2809 |
| Offset: | 000B31C0 | 000B31EC | 000B3218 | 000B3244 | 000B3270 | 000B329C | 000B32C8 | 000B32F4 |
| 3 of 4 | Pittsburgh | Philadelphia | Quebec | San Jose | St. Louis | Tampa Bay |
|---|---|---|---|---|---|---|
| 1 | 20DC | 208B | 2000 | 2000 | 2000 | 2000 |
| 2 | 20DD | 20F0 | 2001 | 2001 | 2001 | 2129 |
| 3 | 20DE | 20F1 | 2101 | 210F | 211B | 2023 |
| 4 | 20DF | 20D4 | 2102 | 2110 | 211C | 212A |
| 5 | 20E0 | 20F2 | 2103 | 2003 | 209E | 212B |
| 6 | 20E1 | 20F3 | 2104 | 2111 | 211D | 212C |
| 7 | 20E2 | 20F4 | 2105 | 2112 | 211E | 2081 |
| 8 | 20E3 | 20F5 | 2106 | 2013 | 211F | 212D |
| 9 | 20E4 | 20F6 | 2107 | 2113 | 2120 | 2023 |
| 10 | 20E5 | 20F7 | 2001 | 2114 | 2121 | 212E |
| 11 | 20E6 | 2800 | 2800 | 2800 | 2800 | 2800 |
| 12 | 20E7 | 20F8 | 2009 | 2009 | 2009 | 2009 |
| 13 | 20E8 | 20F9 | 200A | 200A | 200A | 20CC |
| 14 | 20E9 | 20FA | 2108 | 2115 | 2122 | 202A |
| 15 | 20EA | 20CC | 2109 | 2116 | 2123 | 212F |
| 16 | 20EB | 20FB | 210A | 200C | 2124 | 2130 |
| 17 | 20BE | 20FC | 210B | 2117 | 2125 | 2131 |
| 18 | 2066 | 20FD | 210C | 2118 | 2126 | 2132 |
| 19 | 20EC | 20FE | 210D | 201A | 20FF | 2133 |
| 20 | 20ED | 20FF | 210E | 2119 | 2127 | 202A |
| 21 | 20EE | 2100 | 200A | 211A | 2128 | 2134 |
| 22 | 20EF | 2809 | 2809 | 2809 | 2809 | 2809 |
| Offset: | 000B3320 | 000B334C | 000B3378 | 000B33A4 | 000B33D0 | 000B33FC |
| 4 of 4 | Toronto | Vancouver | Washington | Winnipeg | Allstars E | Allstars W |
|---|---|---|---|---|---|---|
| 1 | 2000 | 2000 | 2153 | 2000 | 216F | 217F |
| 2 | 2001 | 2140 | 20B1 | 2162 | 2170 | 202F |
| 3 | 2129 | 2141 | 2154 | 20B1 | 2171 | 2180 |
| 4 | 2135 | 20A1 | 2155 | 2163 | 2172 | 2181 |
| 5 | 2032 | 2142 | 2156 | 2164 | 2173 | 2182 |
| 6 | 2136 | 2143 | 2157 | 2164 | 2174 | 2110 |
| 7 | 2003 | 2144 | 203F | 2165 | 207B | 206E |
| 8 | 20D3 | 2145 | 2158 | 20A3 | 20B5 | 2183 |
| 9 | 2137 | 2146 | 2015 | 2166 | 2175 | 2184 |
| 10 | 2111 | 2147 | 2016 | 2167 | 2176 | 20B1 |
| 11 | 2800 | 2148 | 2159 | 2800 | 2800 | 2185 |
| 12 | 3000 | 2009 | 215A | 2009 | 20F8 | 2186 |
| 13 | 3801 | 2149 | 215B | 2168 | 2177 | 2037 |
| 14 | 2138 | 214A | 215C | 215B | 2178 | 2187 |
| 15 | 2139 | 214B | 215D | 2169 | 2179 | 2188 |
| 16 | 213A | 214C | 215E | 216A | 217A | 2189 |
| 17 | 213B | 214D | 212F | 216A | 217B | 200B |
| 18 | 213C | 214E | 215F | 216B | 2084 | 218A |
| 19 | 213D | 214F | 2160 | 216C | 20C0 | 218B |
| 20 | 213E | 2150 | 201C | 216D | 217C | 218C |
| 21 | 213F | 2151 | 201D | 216E | 217D | 20BC |
| 22 | 3800 | 2152 | 2161 | 2809 | 217E | 218D |
| Offset: | 000B3428 | 000B3454 | 000B3480 | 000B34AC | 000B34D8 | 000B3504 |
The values above are the assigned tiles by default for each team in the .bin file. Below is the Tile Layer Pro representation of the above which starts at offset 000AFE1C. I put "2000" and "2001" on the image so you can see where the tiles begin. Those are Anaheim's first 2 startup banner tiles. Most teams share tiles with other teams to save space in the bin.

I will eventually have an example of how I modified the Startup Banners.
by Evan
This is how you can change the team overall ratings. This doesn't seem to affect the team's gameplay, but you may want to make these numbers more accurate for your teams.
Bin File Offset: 000FE18E

|
33 - Anaheim - Rating in game: 51 | |
4A - NY Rangers - Rating in game: 74 |
|
4C - Boston - Rating in game: 76 | |
37 - Ottawa - Rating in game: 55 |
|
49 - Buffalo - Rating in game: 73 | |
45 - Philadelphia - Rating in game: 69 |
|
4B - Calgary - Rating in game: 75 | |
4B - Pittsburgh - Rating in game: 75 |
|
4E - Chicago - Rating in game: 78 | |
47 - Quebec - Rating in game: 71 |
|
43 - Dallas - Rating in game: 67 | |
38 - San Jose - Rating in game: 56 |
|
4B - Detroit - Rating in game: 75 | |
45 - St. Louis - Rating in game: 69 |
|
43 - Edmonton - Rating in game: 67 | |
38 - Tampa Bay - Rating in game: 56 |
|
34 - Florida - Rating in game: 54 | |
48 - Toronto - Rating in game: 72 |
|
42 - Hartford - Rating in game: 66 | |
47 - Vancouver - Rating in game: 71 |
|
4A - Los Angeles - Rating in game: 74 | |
48 - Winnipeg - Rating in game: 72 |
|
49 - Montreal - Rating in game: 73 | |
46 - Washington - Rating in game: 70 |
|
44 - New Jersey - Rating in game: 68 | |
5B - Allstars East - Rating in game: 91 |
|
42 - NY Islanders - Rating in game: 66 | |
59 - Allstars West - Rating in game: 89 |
by Evan
In the NHL94 .bin file, there are 2 areas where the New York Islanders and the New York Rangers are listed. For some reason, they don't use the typical area around the rosters for the startup screen name like the rest of the teams. The screenshot below shows where in the hex their names in the startup screen come from.
Thanks to Wboy's research, here's how to make the .bin file use the same set of names for the Islanders and Rangers as the rest of the teams.
Bin File Offset: 000F7CB4

The New York Islanders team name for startup screen The New York Rangers team name for startup screenTo change the Islanders to use the roster team name, simply replace the first set of digits below (000F 7CC6) to 0000 2D2E. This tells the .bin file to refer to this offset (like the rest of the teams). To do the same for the Rangers, simply replace the second set of digits below (000F 7CB2) to 0000 3022. Again, this tells the .bin file to use the roster team name as the startup screen name.

The New York Islanders team name reference code The New York Rangers team name reference codeIt's probably a good idea to apply this edit to any .bin file that you'll be editing so if you ever change the team names, you won't have to worry about the Islanders and Rangers team names not changing.
by Evan
Thanks to Wboy's research, we know how to edit the defaults on the startup screen menu. Below are the values for each menu item, and what each one changes.
Bin File Offset: 00017C8E

Play Mode - 0000 for Regular Season, 0001 for New Playoffs, 0002 for New Playoffs/7 Game, and 0003 for Shootout Players - 0000 for Demo, 0001 for One - Home, 0002 for One - Visitor, 0003 for Two - Teammates, and 0004 for Two - Head to Head Team 1 - 0000 for Anaheim through 001B for Allstars West Team 2 - 0000 for Anaheim through 001B for Allstars West Period Length - 0000 for 5 Minutes, 0001 for 10 Minutes, and 0002 for 20 Minutes Goalies - 0000 for Manual Control, and 0001 for Auto Control User Records - 0000 for On, and 0001 for Off Penalties - 0000 for Off, 0001 for On, and 0002 for On, except off-sides Line Changes - 0000 for On, 0001 for Off, and 0002 for AutoOf course, these values will change according to hacks. If you're 3 period lengths are 30 seconds, 5 minutes, and 7 minutes, then the 0001 would equal 5 minute periods.
by Evan
I figure the best way to explain this is to actually edit a team's logo with this tutorial. Before continuing, please make sure you have the programs Tile Layer Pro, the Gens emulator, and the Bin file open and ready to use in Tile Layer Pro. Having Hex Workshop is a plus too!
Lets start by opening up the nhl94.bin file found through this website or one you have. You can switch the format to Genesis under View->Format->Genesis. You can also zoom in on the Bin file by clicking the zoom button at the top if you like.
Scroll down the file using the page down key to get to the offset around 000EDA88 (92%). The offset can be read from the status bar at the bottom of the program. You should also see the format, and the size of the file there as well.
You can leave the Palette Editor on the colors it's currently showing. The logos will seem to have wrong colors, but this really doesn't matter once you start the game up in the emulator. The logo colors will be fine in the game.
At this point, you should be seeing the ice logos, but they probably look all broken up. By using the plus and minus keys on the keyboard, you can shift the rows of tiles until a logo lines up correctly in their respective rows (I chose Calgary's logo to lineup).
Ice logos are 6 tiles across and 4 tiles down, giving each ice logo a total of 24 tiles. Each tile is 8x8 pixels. This means that each ice logo is 48x32 total pixels.
Let's focus on Calgary's logo. That is the 3rd logo down from the beginning of them. Line it up so it looks something like this by using the arrow keys, and the plus and minus keys:

Once you have it to this point, here's how you edit Calgary's logo. Left-click the first Calgary tile and then right-click it on the Tile Arranger as shown below:

Continue to do this process, putting the tiles in the Tile Arranger as you would to view the logo correctly and eventually you should end up with the following image:

Now you know what the Calgary logo looks like together in Tile Layer Pro. That is the entire ice logo for Calgary, being a total of 48x32 pixels.
From this point, you can create what I call a "palette test". Left-click the first Calgary tile in the Tile Arranger and then Left-click the first color in the Palette Editor (it is usually black). Now "draw" the black into every pixel of the first tile by Left-clicking within the first tile in the Tile Editor. Now Left-click the 2nd tile in the Tile Arranger, left-click the 2nd color in the Palette Editor, and "draw" the green into the 2nd tile in the Tile Editor. Continue this process until you have something like the screenshot below:

Now save the Bin file as something new, so you can see what this test looks like in the game. Start up the Gens emulator and load up the file you just saved. Select Calgary as the home team. The reason for doing this is to learn which colors become which in the actual game. You will see that the first black = transparent/ice color, the 2nd black = light grey, etc.

Write down or type somewhere what each color represents in the Palette Editor. This is an example of what I usually write down: (Remember, the left column is the colors from Tile Layer Pro, and the right column is the actual colors in the game.)
| Palette Color (RGB color in Tile Layer Pro) |
Ice Color (for Calgary in this example taken straight from the palette test above) |
|---|---|
| Black 1 (0,0,0) | Transparent/equal to ice color (0EE8) - same for every team |
| Green 1 (99,207,99) | Dark Grey (0222) |
| Blue 1 (57,51,255) | Black (0000) |
| Off White (220,255,255) | Maroon (0006) |
| Blue 2 (51,0,134) | Dark Red (0008) |
| Tan (191,115,0) | Red (000A) |
| Blue 3 (0,207,255) | Pink (088C) - same for every team |
| Cream (239,235,180) | Darker Pink (066A) - same for every team |
| Maroon (147,0,0) | Darker Orange (008C) |
| Green 2 (81,255,0) | Orange (00AE) |
| Orange (255,172,0) | Red (000A) |
| Purple 1 (188,17,164) | Grey (0CCC) |
| Black 2 (0,0,0) | Light Grey (0EEE) |
| Blue 4 (89,140,242) | Darker Grey (0AAA) |
| Purple 2 (182,0,159) | Darker Orange (048C) - same for every team |
| Green 3 (131,220,0) | Turquoise (0A84) - same for every team |
These colors come from the team uniform colors. You will notice patterns with each team's colors, like every team will have a black, a white, pinks, etc. Every team will have pinks for the skin color, every team will have black for the gloves and skates color, etc. If you change a team's uniform colors, the ice logo will use those colors depending on which ones you changed.
You can find these hex values for each color if you goto the team's uniform colors area in the hex editor. Compare this chart with the editing section on uniform colors (I used Calgary for both), and it should help you understand how it works. You could do a palette test for each team, take a screenshot of it, and keep it for reference if that helps.
Now, lets open up the original Bin file and change Calgary's ice logo from having a red "C" to having a black "C". We can look at our chart above to see that "blue 1" will give us black. All we have to do is open the Bin in Tile Layer Pro, and replace the "tan" with the "blue 1" Palette Editor color as shown below:

Now let's save this file as something new, like cal-black.bin, and open the Bin up in Gens. Choose Calgary as the home team, and this is what the ice logo should now look like:

So now you should be able to edit ice logos using Tile Layer Pro by drawing on tiles.
There is also an import BMP function in the program. I have used this, but didn't get the results I was looking for. Basically, what you would do is create an image in a program like Photoshop, Paint, etc., and make the image size 48x32. Then, break up your image into 4 rows, each being 48x8 pixels in size. This equals 1 row of tiles in Tile Layer Pro. Then you import each row image into Tile Layer Pro (one at a time), and move it to the corresponding spot in the Bin by dragging it with the mouse. When you're happy with it's location, you click off the image and it will inherit that location.
by Evan
I have not seen how other hackers make the puck, but I just quickly made one that looks pretty good using Tile Layer Pro. Below are the screenshots that should help you find the puck (offsett is around 0007B000, 48% in the .bin file). The first screenshot is the default puck graphics, and the second screenshot is the graphics I changed. You will need to change all of the 8 puck tiles for the transitions of the puck moving around in the game to look good. You can play around with the shadow tile as well.


Play around with the graphics until you're happy with how the puck looks on the ice. If anyone has nice screenshots of their pucks in Tile Layer Pro, let me know so I can add that to this website. Thanks!
by Evan
Below is a screenshot showing where the player stars are in Tile Layer Pro. The first 4 tiles are player 1's star, the next 4 tiles are player 2's star, and the next 4 tiles are the highlight state for when someone has the puck. I have put these in the arranger below to show that this graphic is half of the star, and then mirrored to complete the star in the game. You don't have to worry about the mirroring part, that happens automatically.
Bin File Offset: 0007C144

Once you put those tiles in the arranger as shown above, you can easily edit them to be anything else. Below is a screenshot of what I changed the stars to (in this case, to circles). At the bottom of this page are screenshots of the circle in the game.

Screenshots of the circle instead of player's star.


by Evan
It is possible to edit the Bin file, and play it on the actual Genesis console. What this requires is that you puchase a piece of hardware and cables that connect to your computer from Tototek. This hardware comes with a formatted Genesis cartridge that you connect onto the hardware. This hardware is known as the MD-Pro 32 or MD-Pro 64. You can purchase a 32 meg card or a 64 meg card.
Once you receive the MD-Pro card, you will probably have to mess around with it until you get it working. For one, it requires that you set your bios parallel port to EPP. It also requires that you attach a parallel and usb cable to your computer at the same time. These should also be purchased from Tototek to ensure compatibility.
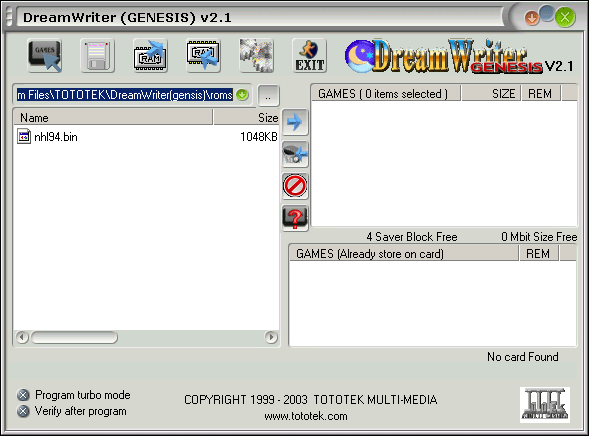
They provide free software for the MD-Pro cards off of their website called Dreamwriter. The latest version of the software may NOT be the best for your computer. If the latest version doesn't work, try older versions. Personally, I am using an MD-Pro 32 card with Dreamwriter version 1.6 on an old laptop.
This is a screenshot of Dreamwriter v.2.1:
The hardware and software are pretty simple to learn and use. For more infomation, visit their website and their forums.
This site created and maintained by Admins of the NHL'94 Forums 2003-2020.